
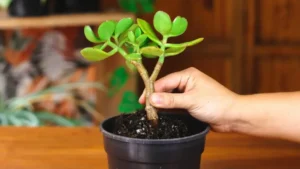
Zamioculcas Zamiifolia, also known as ZZ Plants, are popular among gardeners like you and me. They are both attractive and easy to care for all year. ZZs can quickly fill your homes with these pretty, long-living plants, which are covered in dark, glossy leaves and can grow 2-3′ tall.
ZZ Plants are so beautiful that you would certainly want to build your collection of them.
But here comes the catch. Buying so many ZZ Plant is a costly affair. What if wetell you that you can have the whole club of ZZ Plants absolutely free in a few weeks?
Yes, you can easily propagate ZZ Plant in 3 ways and they’re very simple. Let’s take a look at them.
But first let’s start with the basics.

Table of Contents
When should we propagate a ZZ plant?
Early spring or summer are the best times for propagating ZZ plant stem cuttings or leaves or for dividing them. It will aid in their recovery, giving them a better chance of success.
Methods of Propagation
There are several methods for propagating a ZZ plant. You can easily create new babies and can add them to your collection. The suitable methods of propagation are:
- By Stem Cutting
- By Leaf Cutting
- By Division Method
Now we will talk about these methods of propagation one by one.
1) How to Propagate ZZ Plant from Stem
The easiest way to propagate the ZZ plant is through stem cuttings. It takes less time than others and can efficiently give you fruitful results.

Choosing the Right Stem
A healthy cutting is the foundation of healthy ZZ plant propagation. We suggest you pick a healthy stem with good green leaf growth. It will help to propagate the ZZ plant much faster.
Strictly avoid stems with yellow or brown leaves. Damaged or left with diseases can block your growth. It may even spread to your little friends.
You can also consider aesthetics while selecting a stem. When you cut your mother plant, it will be exposed to a mark. Choose a specific part that is covered by other foliage. Evaluate the overall balance of the ZZ plant and take two cuttings – one from each side – to keep the plant’s shape.

How to propagate through a stem cutting?
- Start by taking a sterilized knife or scissors and cutting a stem from the ZZ mother plant.
- Make the cutting is at least 4 inches long and has some healthy leaves near the top.
- You can propagate the ZZ plant with one cutting or by slicing the large cutting. It will work well as long as each section is at least three to four inches long and has a few healthy leaves.
- Now when you have the stem cuttings, place them somewhere warm for a short period. It will allow the cut ends to heal from the shock.
Note:
Some gardeners only wait a few hours, while others wait up to three days. Although it is not required, waiting decreases the chances of root rot.

There are two ways to propagate ZZ plant by stem method:
- By growing in water
- By growing in the soil
Let’s get into the details of propagating the ZZ plant.
Propagating ZZ Plant in Water
Step 1: Place the cutting in a glass of water
You should simply place the stem cuttings into a container or glass of water. You should not fill it with a lot of water: just enough to ensure that the cut ends are covered.
Step 2: Place the glass in a warm place

Put the glass somewhere warm and light, and change the water once or twice a week.
Step 3: Be patient while propagating the ZZ plant
The time ZZ plant propagation takes for new roots to form varies, and you should be prepared to wait. You can witness some signs within a week or two, but the roots may take two months or more to grow.
If your new ZZ plant propagation takes more time, wait before repotting into the soil.

Propagating ZZ plant in soil
Step 1: Take a small pot
Select a pot that is at least 4-6 inches wide with adequate drainage holes at the bottom. Fill the medium with a high-quality potting mix. For ZZ plant propagation, use a tropical potting mix of coco coir and perlite.
Step 2: Place cuttings in the pot
Now, gently place the cuttings into the medium. Typically, three cuttings will fit into a 4-inch wide planter, while five cuttings will fit into a 7-inch wide planter.
Step 3: Spread a layer of soil
Fill in the remaining space around the ZZ stem cuttings, leaving about an inch at the top.
Step 4: Water your ZZ plant cuttings
You should water your new propagating ZZ plant thoroughly. Make sure the water drains well from the medium. If you see your soil settling down after watering, do not panic; it is normal.
Step 5: Place cuttings in the right location
Move the propagating ZZ plant to a location with bright indirect light. You should not expose the cuttings to direct sunlight as it can burn the delicate foliage.
Step 6: Keep a check on your ZZ plant propagation
You should examine your ZZ plant every few days. Water it before the soil becomes too dry. ZZ stem cuttings thrive in moist but not soggy or muddy soil.
Not sure if your ZZ plant propagation attempt was a success?
Gently tug your ZZ cuttings if it’s already been a while. If you feel something growing out there, roots have formed! Just don’t disturb your new ZZ plants too much to avoid accidentally damaging the delicate roots.

2) Propagating ZZ plant from leaves
Yes, you heard that right! Just like stems, you can easily propagate a ZZ plant from leaves, that too, even with a single leaf. Although this procedure with leaves will take a long time to mature enough this way, you won’t be harming the mother plant to propagate it.
Choosing the right leaf from propagation
For ZZ plant leaf propagation, use disinfected pruning shears or a sharp knife. If you haven’t used your scissors or knife in a while, you should wash them in soapy water. Any infection or bacteria on the knife can enter the plant and cause severe diseases.
Examine the leaves of your ZZ Plant before making any cuts. Ideally, choose leaves that are full, dark green, and glossy. You should avoid yellow leaves, curling, turning brown, or attaching to an unhealthy stem.
Propagating a ZZ plant is challenging both for you and the new plant, so you should give it the best possible start.
Ideally, choose 4-6 vibrant leaves for ZZ plant propagation. Doing this will elevate your chances of victory while giving you a fuller-looking pot as the leaves take root.
How to propagate a ZZ plant from a leaf?
Here wewill talk about two ways of propagating ZZ plant:
- By growing in water
- By growing in the soil
Propagating ZZ plant from leaves in water
You can root these leaves in water using a glass. However, it is more complex than stem cuttings. The water line must remain low to avoid touching the main section of the leaves, which you must regularly top as it evaporates.
You will need a thin glass to prevent the leaves from falling over and rotting in the water.
Step 1: Fill the glass halfway with filtered or distilled water and place the leaves inside.
Step 2: Continue to top off the water as needed daily or every few days and let them do their own thing.
OR
You can try the water method for better growth.
To encourage new growth, make a clean cut along the bottom of the leaves, snipping off the bottom quarter. If you choose this method, you should wait for the leaves to heal before dipping them in water.

Propagating ZZ plant in soil
This method is easy and reliable. You won’t have to top up the leaves frequently.
Step 1: Take a tray to propagate the ZZ plant
Fill a tray and water beforehand with a mixture of coconut coir and perlite, allowing the excess to drain. Then, place the leaves upright into the soil, exposing most of the leaves.
Step 2: Place the leaf cuttings in a warm spot
To avoid disturbing the leaves, keep the tray in a warm, bright location away from draughts. It may take several months for a rhizome to form and even longer for a whole plant to develop. These low-maintenance plants are well worth the wait.
Step 3: Transplant once the rhizomes grow
If you notice rhizomes growing small roots, transplant the leaves into a larger pot. It will give your plant room for growth. Alternatively, you can wait for them to grow longer roots before transplanting to avoid shock.
Step 4: Give your leaves a good environment.
Prepare the soil mixture. Keep the new pot in a bright indirect light spot and the soil evenly moist.

3) By Division Method
Dividing your plant is the simplest way to divide a single plant into two or more. You can propagate a ZZ plant at any time, but the best time is when it’s time to re-pot. You’ll be disturbing your ZZ plant anyway.
You can work the start division method during or before the spring growing season. The disturbance will have less of an impact on the plant at this time.
Make sure each plant you separate has a healthy rhizome and good root development. You may need to grow your new ZZ plants in pots the same size or even smaller at this stage.
Steps to propagate ZZ plant through division:
Step 1: Remove your ZZ plant from the existing pot
Begin by drawing the plant from its current pot, as with repotting. You can water them for a couple of days before making removal easier. If it’s still stuck, gently squeeze the sides of the pot to free it.
Step 2: Wah the roots with water
You should clean the old soil to make the root growth more visible. Before separating, rinse the ZZ plant under water to remove any traces of old soil.
Step 3: Divide your ZZ plant into sections
Now when you can clearly see the rhizomes and roots, you should divide your plant into distinct sections. Make sure while doing this you do not give a shock to the ZZ plant. Each section of ZZ plants should have plenty of root growth to avoid any stress problems.
Step 4: Clean your knives before dividing them
You can manually pull out some divisions, while you can cut others. Make sure to separate them with a sharp knife because any damage further will consume time to recover. It can leave your plant vulnerable to pest and disease infection.
Note:
If your ZZ plant is overcrowded, things may get overwhelming for you. Fortunately, your plant can still survive if cut into small sections, as long as each section has enough roots. Cut straight into the rhizome with a sharp, disinfected knife, avoiding root and stem damage as much as possible.
Step 5: Fill the pots for new ZZ plants
You should fill as many pots as you have plant sections with a potting mix. Fill the bottom container and around the gaps with more soil up to an inch or two. Place the sections.
Step 6: Provide them with light and water
After spreading a layer of soil on the divisions, water them thoroughly. Place the new ZZ plant propagation in a spot with indirect light and continue to water thoroughly until the plants settle.

Which way is better: Water or Soil for propagating a ZZ plant?
Both methods are efficient in their own ways for propagating the ZZ plant. The water method is great because you can easily see the roots growing, whether you’re using leaf or stem cuttings. You can easily skip the guesswork in the process.
You can witness your hard work as the roots sprout.
On the other hand, rooting stems or leaves in soil requires less care and maintenance. The soil retains more moisture than a thin layer of water can, especially on a hot day. You can skip the repotting work once the roots develop.
You can choose which method, water or soil works best for you for propagating the ZZ plant. Now, how will you care for them once you have grown your ZZ plant through propagation? What extra care do they need, and what not to do to offend them?
How to care for new ZZ plant propagation?
Caring for ZZ plants is very easy, but you need to be a little cautious as your little friends adapt to the change.
1) Light
If you want your ZZ plant propagation to grow, you must provide it with light. It is best for your plant’s long-term health if you can place it in a room with bright natural or artificial light.
But be cautious! You can easily assume that plants prefer “bright light,” which requires direct light. Placing your ZZ Plant in a window that receives direct, unfiltered sunlight will burn its leaves and harm it. Ideally, you should place your plant several feet away from the window.
2) Soil
Newly propagating ZZ plants aren’t picky about soil type as long as it drains well. However, you should provide the ratio of 3 parts general potting soil to 1 part succulent or cactus mix. You can also mix in some bark or perlite to make the soil even airier.
3) Water
You should only water your new ZZ plant propagation when the top couple of inches of the potting mix is dry. Water your ZZ plants every two weeks, depending on the temperature and time of year. Keep in mind that your cuttings are still baby ZZ Plants. They will require less water than mature ones.
Unsure how much water is too much?
Mist your ZZ Plant and watch for changes in the leaves. Wrinkled leaves indicate that your cuttings require more water.
4) Temperature
Newly ZZ plant leaf propagation or stem adores high temperature. They establish new rhizomes. On the other hand, mature plants do not usually require special temperature conditions once it has begun to develop their root system.
For maturing ZZ Plants, an indoor temperature range of 59 to 79 degrees Fahrenheit would work.
Note:
You should avoid keeping your ZZ plants in draughts, heating, and cooling vents. Instead of an entrance, choose a room with a consistent temperature throughout the year.
5) Humidity
ZZ Plants adore high humidity. It may need more water if you witness dry edges on your ZZ leaves, leaf drops, or wrinkling leaves. As overwatering can harm ZZ Plants, you can increase the humidity around your plant.
You can mist your plant with clean water from a spray bottle 1-2 times per week as it can help retain moisture. Alternatively, you can consider adding a humidifier to your room to increase humidity more effectively.
6) Fertilizer
You can also consider adding fertilizer once your ZZ plant propagation grows. You can buy fertilizer from a local nursery or our store. Remember that your ZZ cuttings still have small rhizomes and do not require a lot of fertilizer to get started.
You should use only a small amount of diluted fertilizer for the first couple of feeding sessions. Examine the leaves for any negative changes, such as yellowing. You can gradually increase the amount as your ZZ plant grows and matures.
Conclusion
You can unveil your creative side by propagating a ZZ plant. These are an incredible addition to your indoor collection and catch eyes often.
ZZ plants are easy to propagate, and all three methods (stem, leaf cutting, or division) are successful. Be patient while propagating the ZZ plant as it is a slow process. But don’t let that demotivate you from owning a bunch of new green buddies.
When are you planning to start ZZ plant propagation and adding cute babies to your home space?
FAQs
Q1. Why are my ZZ plant cuttings rotting or turning yellow in the water while propagating?
If you are using the water method, make sure to clean the glass and change the water frequently. It will keep it fresh and clean and replenish oxygen.
Plant your propagating ZZ plant in water once it has roots (whether you started with leaves or a stem). You can wait till rhizome forms, but don’t be too patient. If you leave the water propagating ZZ plant in water for a long time, it will eventually turn yellow and rot.
Q2. How long does it take ZZ cuttings to grow?
It depends upon the health of the stem or leaves of the zz plant. ZZ propagation cuttings can take a long time to root, even though they are easy to propagate.
Usually, it may take up to 4 to 5 months, even with ideal temperatures and lighting. However, it is best to wait until the roots are at least 1 inch long before potting them up in the pot or container. It can take several weeks.
This whole procedure can take up to 9 months if the temperature is below 75°F or there is insufficient light. You have to be patient while propagating the ZZ plant. You can also use artificial light to add extra warmth to help them root faster.
Q3. Why do we have difficulties in propagating a ZZ plant?
There are numerous reasons why your ZZ plant is not propagating. Cool temperatures, dry air, and excessive or insufficient watering can all negatively impact your hard work.
If you live on the cooler side, use artificial lighting. You can do a light misting every few days if the air is dry.
The soil should always be evenly moist, never soggy or too dry. If using a vase, don’t let the water evaporate below the developing roots.
Q4. How long does a ZZ plant root in water take?
A ZZ plant can take 3 to 4 months or longer to root in water. Before potting them up, give them plenty of time to develop mature roots at least an inch long.
Q5. Can we propagate the ZZ plant from a broken stem cutting?
Yes, you can propagate the ZZ plant from a broken stem as long as it has leaves on top. Start trimming the damaged end to create a straight, clean cut.
Although ZZ plants propagation is a very slow process, yet simple. It can be a fun exercise to play with your mother plant and turn it into a family of new green babies.


